


To manage different applications, increase your productivity, and multitask effortlessly on your Windows PC, consider setting up dual monitors for a split-screen experience. You can seamlessly shift between your gaming session and your program window, move from one application to another, or even have two windows open for comparing documents or data.
Start by ensuring that your secondary monitor is correctly connected to your PC, using either an HDMI port or any other compatible port. Your operating system, be it Windows 10 or 11, should automatically detect the presence of a second screen.
The next step involves arranging your screens to ensure they mimic your physical desktop setup. Open the display settings on your computer to access the ‘multiple displays’ section. You can then rearrange the displayed monitors. Learning the essential keyboard shortcuts can drastically improve your efficiency when working with dual monitors in Windows.
Setting up Dual Monitors on Windows 10

Your operating system must be up-to-date before connecting multiple monitors for a split-screen display on your Windows PC. If you have not yet updated your computer to the latest version of Windows, you should consider doing so for the best performance.
Your computer will also need to have HDMI ports to connect the two monitors. After linking your monitors, Windows will automatically detect and display them.
To access the Display Settings, right-click on your desktop and select ‘Display settings’ from the drop-down menu. Here, you can rearrange the order of your monitors to match their physical layout.
Once you’ve set up your monitors, you’re ready to start using the split-screen function. The advantage of this setup is that you can have two windows open at the same time, effectively giving you a dual display. This is particularly useful when setting up a more efficient workspace.
Understanding the Split Screen Function
The benefit of setting up dual monitors lies in the ability to simultaneously open and operate different applications on each screen. This enhances productivity and multi-tasking capabilities on your Windows 10 or 11 desktop. It also offers more convenience, especially for tasks that need constant switching between open windows.
To achieve this, you will need to master the keyboard shortcuts that enable you to swiftly navigate and manage multiple open windows. The ‘Windows Key’ along with the arrow keys can be used to move a window to the left or right-hand side of a screen.
A little-known secret is the split-screen mode. This feature automatically resizes two windows to fit side-by-side on a single screen. This can prove especially valuable when working with multiple documents or applications at the same time.
As a final tip, remember that personalizing your workspace can drastically improve user experience. Feel free to organize your screens, adjust the display settings, and experiment with different screen layouts until you reach your optimal setup. Setting up dual monitors in Windows 10 and 11 can enhance your desktop experience by allowing you to split the screen for multiple tasks.
Benefits of Dual Monitors | How to Utilize
Enhances productivity and multi-tasking capabilities | Master keyboard shortcuts for swift navigation
Allows for simultaneous operation of different applications | Use ‘Windows Key’ with arrow keys to move windows
Offers a multitask boost for tasks requiring constant switching between windows | Utilize split-screen mode for side-by-side window display
Improves user experience through personalized workspace | Organize screens, adjust display settings, and experiment with different layouts
Step-by-step Guide to Using Split Screen on Laptop and Monitor
Split screen is a feature that takes full advantage of your PC’s capabilities. It allows for a more immersive and efficient workspace particularly when using multiple monitors or dual monitors for different tasks simultaneously.
Here is a guide on setting up and managing dual monitors in Windows 10 and Windows:
Step 1: Connect Your PC to the Monitors

Start by connecting your laptop to the external display. This is typically accomplished using the HDMI port provided on most PCs.
Step 2: Detect the Monitors in Windows
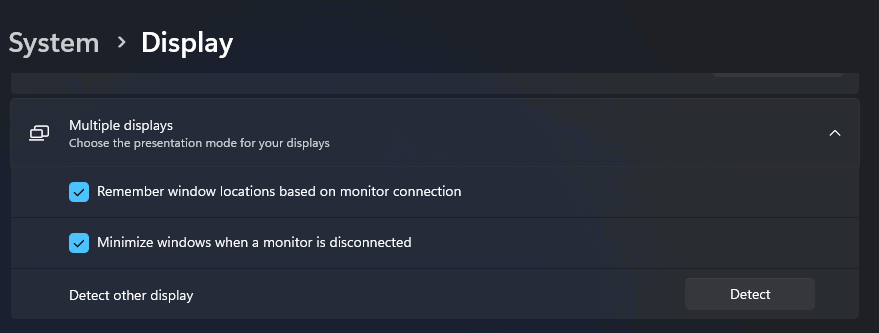
Once the monitors are connected, navigate to the ‘Display Settings’ in your operating system. Here, click on the ‘Detect’ button and your computer should automatically recognize and display the connected monitors.
Step 3: Configure Display Settings
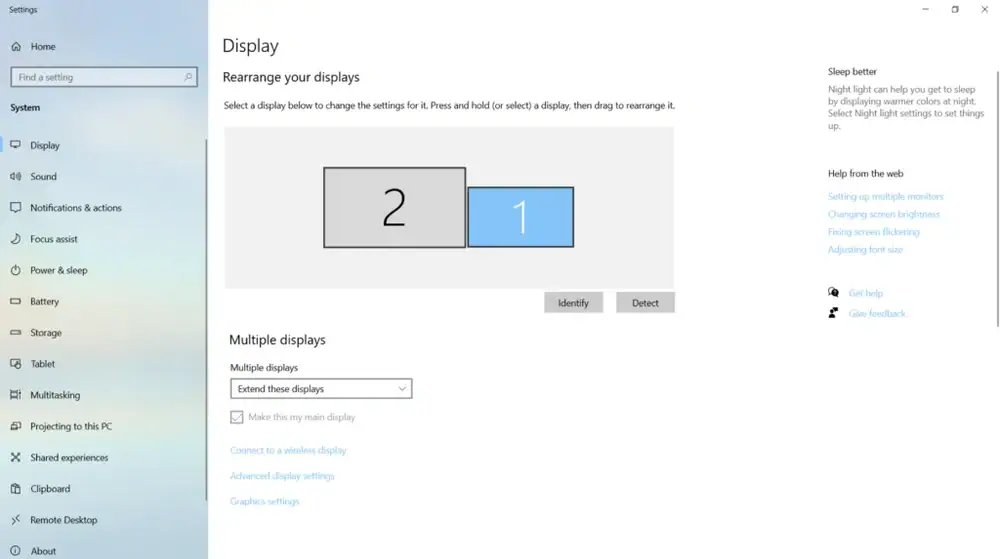
You can then choose the ‘Extend These Displays’ option if you want to spread your desktop across multiple monitors. Alternatively, select ‘Duplicate These Displays’ if you prefer having the same content shown on all your multiple monitors to maximize the information helpful for your tasks.
Utilizing Microsoft for Monitor Configuration
The split screen feature can double your productivity by allowing two different applications to comfortably fit into your computer screen. This creates an organized, user-friendly layout, which you can easily rearrange according to your needs and preferences in Windows.
To do so, open your first window, then press the Windows key and either the left or right arrow key to snap your window to one side.
Open your second window and repeat the process, selecting the opposite direction.
Now, you can work on multiple windows at the same time, taking advantage of the multitasking capabilities of your Windows PC. Gaming enthusiasts with dual monitors in Windows 10 can also enjoy an extended screen setup. This effectively doubles the on-screen real estate, enhancing the gaming experience.
While the process of setting up dual monitors or exploiting the split screen feature could appear daunting for Windows 10 or 11 PC users, Microsoft’s step-by-step guides make this process straightforward. With a bit of time and patience, you can rearrange your split screen display across multiple monitors in Windows 10 step-by-step.
Split Screen and Dual Monitor Setup in Windows
- The split screen feature in Windows 10 or 11 can double productivity by allowing two applications to run side by side.
- Setting up a split screen is straightforward with the Windows key and arrow keys, allowing users to work on multiple windows simultaneously.
- Gaming enthusiasts can enhance their experience by using dual monitors in Windows 10, effectively doubling the on-screen real estate.
- Microsoft provides step-by-step guides to help users set up dual monitors or use the split screen feature on their Windows PC.
Making the Most of Multiple Monitors
To create a versatile workspace and an expanded canvas for multiple tasks, it is recommended to set up dual monitors. This can be achieved in Microsoft Windows by simply connecting extra monitors, adjusting the display settings using the ‘windows key’, and selecting the ‘multiple displays’ option.
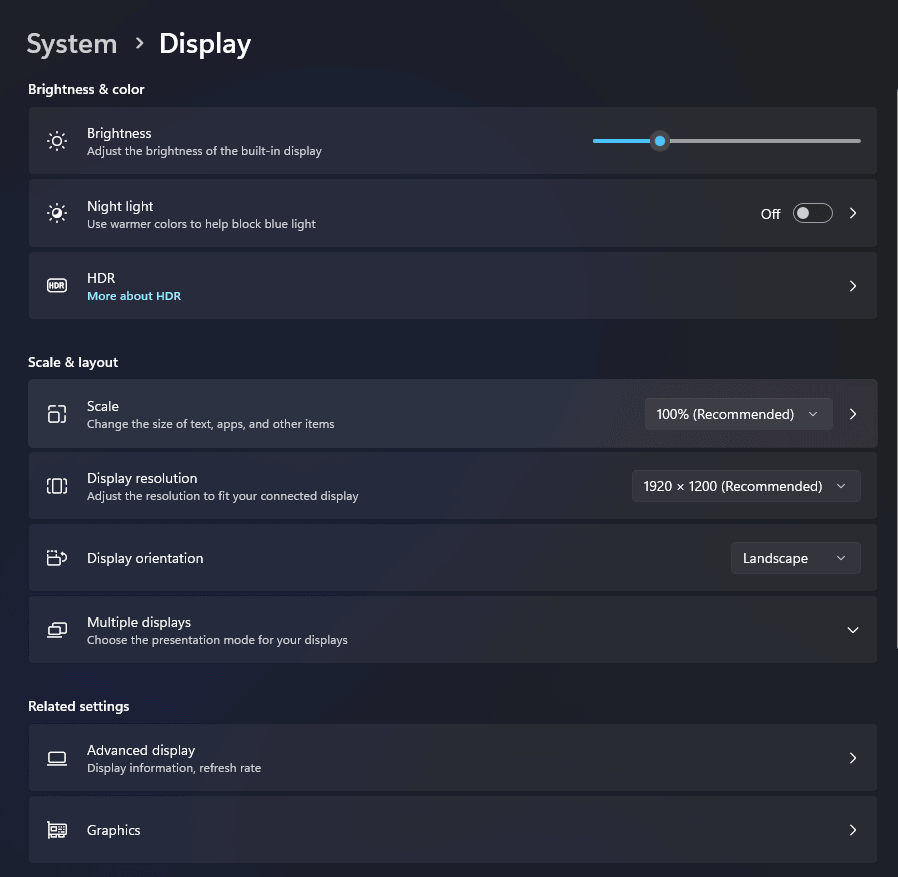
Windows 10 and 11 users have the advantage of customizing their screen layout, allowing them to rearrange their displays to match their physical setup. To access this, open the ‘display settings’ and scroll down to the ‘multiple displays’ section. From here, users can choose to duplicate their displays, extend them, or utilize only one screen.
The split-screen mode is another innovative feature that significantly enhances productivity. This allows users to juggle between two different applications on the same screen.
Both Windows 10 and 11 operating systems offer a shortcut, enabling users to automatically split their screen by dragging an application window to the left or right-hand side of their monitor. Once released, the window will resize to take up half of the screen. This enables users to utilize the full potential of their dual monitors efficiently in a split-screen mode.
Splitting Screen in Windows 10 and 11
Using multiple screens with dual monitors on Windows effectively increases productivity by allowing users to work with two windows simultaneously, displaying different applications or documents on each monitor.
One can easily set up dual monitors in Windows 10 and 11 by connecting their second screen to the PC via an HDMI port or any other compatible port. The operating system should automatically detect the second screen. If not, go to the display settings and manually detect the monitors. You can also rearrange the position of the monitors if needed.
In both Windows 10 and 11, users can also switch between windows by using the Alt + Tab shortcut. This shortcut will display all open windows, and users can navigate to the window they want to focus on.
Whether you’re using a split-screen, dual monitors, or a combination of both, these functions can greatly help in multitasking and improving overall workflow. Remember that the specific steps can slightly vary when setting up dual monitors on Windows 10 due to differences in hardware and the version of Windows.
Benefits of Using Dual Monitors | How to Set Up Dual Monitors
Increases productivity by allowing work in two windows simultaneously | Connect second screen to PC via HDMI or other compatible port
Allows display of different applications or documents on each monitor | If not automatically detected, go to display settings and manually detect monitors
Improves multitasking and overall workflow | Switch between windows using Alt + Tab shortcut
Activating the Second Screen Option
You have the choice of displaying your desktop’s layout across the two monitors or using each monitor separately. Microsoft Support’s step-by-step guide on how to connect your PC to multiple screens can show you how to achieve either.
The steps to do so are straightforward. First, head over to your system’s display settings. Click on the ‘Multiple displays’ dropdown menu and pick your preferred mode. Confirm your selection and, if need be, rearrange the order of your screens for a seamless work experience. With the dual monitor setup, multitasking is a breeze. You can have different applications open on each screen, making it easier to cross-reference information or manage multiple tasks simultaneously. You can take advantage of keyboard shortcuts to snap windows to the left or right side of each screen, further optimizing your workflow.
Users of Windows 10 and 11 also have access to Split Screen mode. This feature allows a single screen to show two applications side by side, essentially creating a dual monitor layout on your Windows PC.
Navigating Dual Monitors in Windows 10
The recent Windows 11 update further expands the dual monitor setup capabilities, allowing users to easily toggle between open program windows and providing a simplified process to learn how to connect the additional monitor.
Whether you’re using Windows 10 or the latest Windows 11, understanding how to manage multiple screens can significantly improve your efficiency.
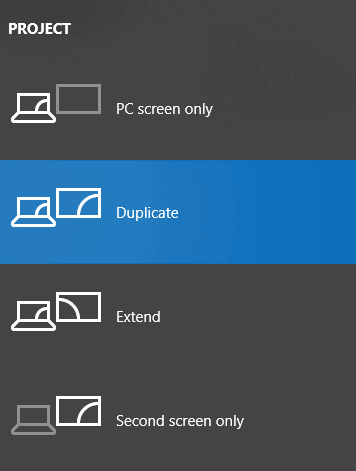
To start, connect your PC to the second monitor through the appropriate port (like HDMI). Afterward, use the keyboard shortcut Windows Key + P to access the ‘projector settings’ and choose one from the options: ‘duplicate’, ‘extend’, ‘PC screen only’, or ‘second screen only’.
Selecting ‘Duplicate’ will replicate your PC’s screen on the monitor, while ‘Extend’ will expand your desktop across both screens. Once the monitors are set up, you can navigate between open windows using the ‘Windows key + left or right arrow key’. This command snaps open windows to the left or right side of your laptop screen in Microsoft Windows
Key Facts About Dual Monitors on Windows 10 and 11
- The Windows 11 update has enhanced dual monitor setup capabilities, making it easier for users to manage multiple screens and improve their efficiency.
- Connecting a second monitor to a PC involves using the appropriate port (like HDMI), and then accessing the ‘projector settings’ with the keyboard shortcut Windows Key + P.
- The ‘projector settings’ offers four options: ‘duplicate’, ‘extend’, ‘PC screen only’, or ‘second screen only’. ‘Duplicate’ replicates the PC’s screen on the monitor, while ‘extend’ expands the desktop across both screens.
- Users can navigate between open windows on the monitors using the ‘Windows key + left or right arrow key’, which snaps open windows to the left or right side of the laptop screen.
Windows PC: Connecting Your Monitor
The operating system, be it Windows 10 or 11, truly shines when handling multiple displays.
To set up dual monitors, go to ‘display settings’ on your computer. Click ‘detect’ and watch as the computer automatically picks up the second screen.
Here’s a handy tip: If your screens aren’t in the correct order, simply rearrange them by clicking and holding the representation of the display you wish to move. Your mouse pointer transforms into a lasso of control, enabling you to adjust the layout of your monitors.
Arrow keys are your friend in this process, allowing you to easily navigate through different applications.
Split-screen mode, a unique feature of the Windows operating system, allows for impressive multitasking. To activate this, select your desired window, then use the windows key and the left arrow to snap it to one side, giving you a clear advantage of Windows 10’s ability to easily manage multiple windows on a single screen.
External Display Versus Laptop Screen
Applications in split-screen mode allow users to multitask efficiently across multiple computer monitors, manipulating windows to the left or right using arrow keys.
The challenge often faced by users is how to operate two or more screens simultaneously.
If you are using a Windows PC, the process of setting up dual monitors or multiple screens in Windows 10 and 11 is not as daunting as it may seem.
With a simple step-by-step guide, you can learn how to connect and set up dual monitors efficiently. Before you can start, ensure that your PC has a multiple display port such as an HDMI port, and that your monitors are compatible. You will also need to check if your graphics card can support multiple monitors.
Once you have confirmed these requirements, here is a simplified guide to setting up dual monitors in Windows:
Step 1: Connect your PC to the monitors using the appropriate cable. Turn on your computer and the monitors.
Step 2: Open the display settings on your computer. In Windows 10 or later versions, you can multitask efficiently in split-screen mode by using the right arrow key to move the active window to the right-hand side of your computer monitor.
Using Multiple Monitors
- Using multiple monitors allows for efficient multitasking, as users can operate different applications on each screen.
- Windows 10 and 11 support dual or multiple monitor setups, making the operating system versatile for different work or gaming setups.
- Setting up multiple monitors requires a PC with several display ports and a compatible graphics card, ensuring high-quality display across all screens.
- Split-screen mode in Windows 10 and later versions further enhances multitasking, as users can easily manipulate the active window using arrow keys.
Keyboard Shortcuts for Quicker Split-Screen Setup

Window resizing is a common task in different applications and operating systems, with keyboard shortcuts allowing you to quickly adjust two equally sized windows. This powerful feature allows you to juggle multiple tasks without losing focus.
You could have a Microsoft Excel sheet running on one monitor, while your second screen displays a research document. To set up this efficient work environment on your Windows PC, connect your monitors to your computer’s ports.
Bearing in mind that the type of connectivity available may depend on your specific computer and monitor types, the most commonly used type is the HDMI port. Once connected, head to display settings from the start menu. Here, you’ll find a section for multiple displays. You’ll likely see your connected monitors displayed here. If not, click on detect for Windows to find them.
Now, rearrange the monitors in a layout that matches your physical setup.
Next comes the ‘split screen’ magic. Divide your screen in Windows by dragging an open window to the left or right edge until the operating system automatically detects, and resizes the two equally sized sections for different applications.
Optimizing Gaming Experience with Dual Monitors

Space for the second window can be created by simply using your mouse pointer to click and hold the first window, then dragging it to the side until it automatically snaps, allowing you to see the various applications on the taskbar.
To maximize the potential of dual-screen gaming, first, master your operating system’s keyboard shortcuts. For instance, Windows users can press ‘Windows Key + Arrow Key’ to swiftly move an active window from one monitor to the other. This proves especially handy when juggling between different applications during intense gaming sessions.
Remember to make use of the ‘display settings’ to correctly organize your monitors in Windows. The ‘detect’ option allows your PC to automatically identify and adjust to the connected monitors. For further customization, the ‘multiple displays’ section provides more options to modify the layout according to your preference.
To conclude, setting up dual monitors for gaming doesn’t just enhance your gaming experience; it also sharpens your multitasking skills and amplifies the usability of your PC. With the right knowledge and steps, one can successfully rearrange the applications on the taskbar, see the various options available through PC settings, or even automatically snap the mouse pointer to a specific point on the first window.
Key Points on Optimizing Dual Monitor Setup for Gaming
- Using keyboard shortcuts, such as ‘Windows Key + Arrow Key’, can significantly facilitate the movement of active windows between monitors, enhancing multitasking efficiency during gaming sessions.
- The ‘display settings’ in Windows provide options to correctly arrange and customize your dual monitor setup, ensuring the best gaming experience.
- The ‘detect’ feature in the display settings enables your PC to automatically identify and adjust to the connected monitors, saving time and effort in manual configuration.
- Setting up dual monitors not only improves the gaming experience but also enhances multitasking skills and overall PC usability.
