

Understanding your GPU helps you make informed decisions on whether to upgrade your graphics card or upgrade to a laptop with a more powerful GPU. So, whether you’re into gaming, video editing, or simply want to understand your machine better, knowing what GPU you have is crucial. To do this, open your Start Menu, navigate to the DirectX Diagnostic Tool, and check your GPU or graphics card for any issues on your Windows PC.
Running regular checks on your GPU and using the DirectX diagnostic tool can ensure optimal performance and bug fixes on your Windows PC.
On a Windows PC, you can use the built-in Device Manager to find out the exact GPU you have. If you are on a Windows 10 or Windows 11 system, another way to check your GPU is through the Task Manager.
For laptop users, GPU information can be found in System Information or the Advanced Display Settings, depending on your operating system.
Identifying Your Graphics Card
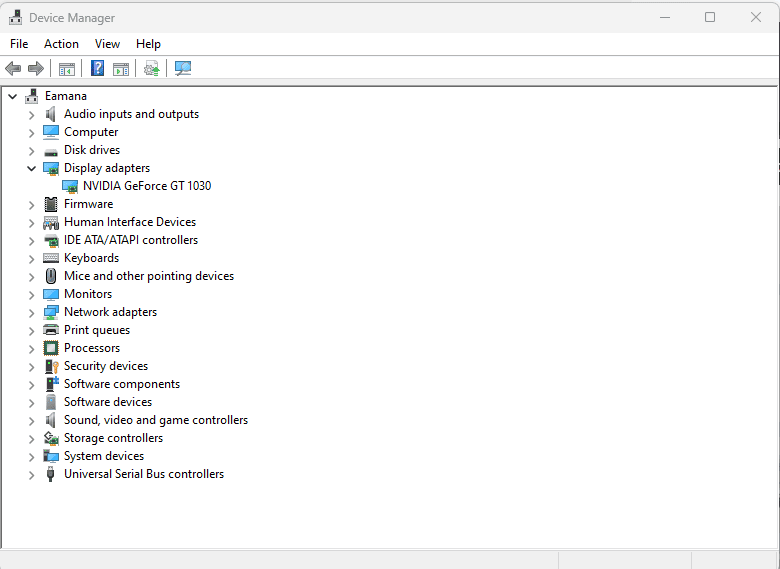
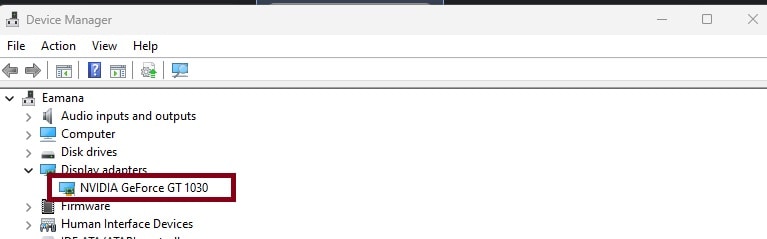
The Device Manager in Windows is a comprehensive tool that provides detailed information about your graphics cards and other system components. This can be immensely helpful if you need to check your GPU or find out what graphics card your laptop or Windows PC is using.
To access it, simply open the Start menu, type in ‘device manager’, and press ‘Enter’. In the Device Manager window, look for the ‘Display adapters’ category, and expand it. The name of your graphics card will be listed under this category.
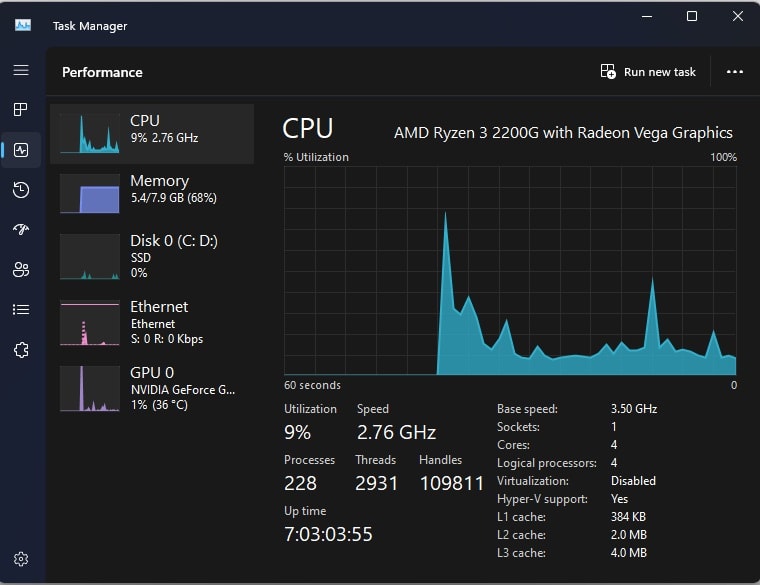
Alternatively, you can use the Task Manager as a quick way to check your GPU. Right-click on the taskbar, select ‘Task Manager’ and click on the ‘Performance’ tab. This provides an overview of your GPU information, including its name and use.
Another tool is the DirectX Diagnostic Tool, which comes installed with most versions of Windows. To use this tool, press ‘Windows + R’, type ‘dxdiag’, and click ‘Enter’. Click the ‘Display’ tab to check your GPU and find out what graphics card your Windows 11 laptop is using.
Quick Guide to Check Your GPU
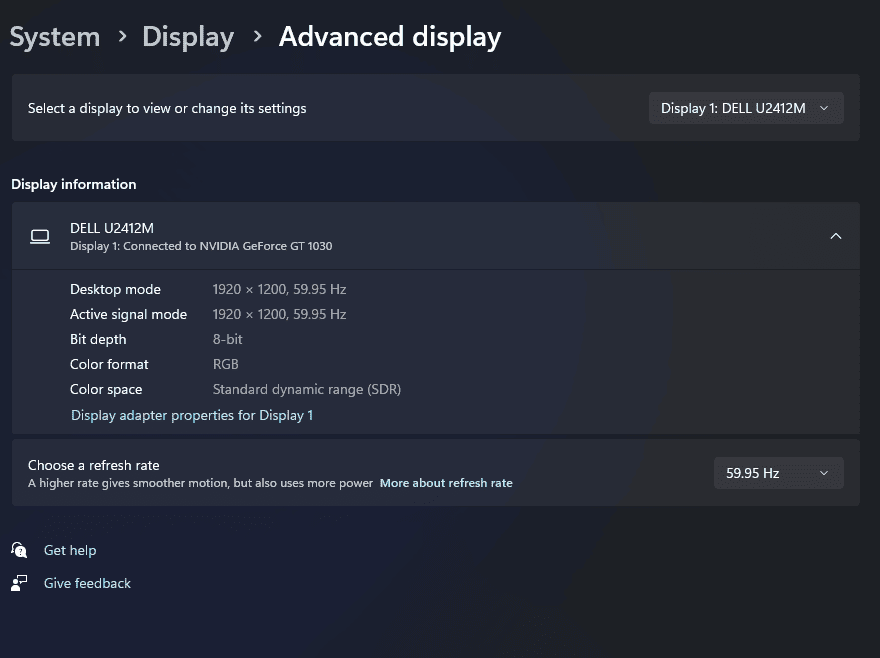
A useful tool for checking the GPU in Windows is the DirectX Diagnostic Tool, which can be accessed through the start menu. You may also access these settings, by right-clicking on a space on your desktop, selecting ‘Display settings,’ then clicking on ‘Advanced display settings. ‘ Here, you will find the name of your GPU next to the ‘Display adapter properties for Display ‘
On Windows 11, you can check your GPU in a similar way. Open the ‘Settings App,’ click ‘System’ and then ‘Display. ‘ There, you will find ‘Advanced Display’ where the name of your GPU is listed under ‘Graphics. ‘
You can also leverage the ‘Spec’ function to find out what graphics card you have. Simply press ‘Win + X,’ select ‘System,’ and then click ‘About. ‘ Now, click on ‘Windows specifications’ to display information about your computer’s specs, including the GPU.
Key Points on Checking GPU in Windows
- The DirectX Diagnostic Tool, accessible from the start menu, is a useful tool for checking the GPU in Windows.
- In Windows 10, the GPU can be checked by right-clicking on a space on the desktop, selecting ‘Display settings,’ and then clicking on ‘Advanced display settings. ‘ The GPU name is found next to the ‘Display adapter properties for Display ‘
- On Windows 11, the GPU can be checked by opening the ‘Settings App,’ clicking ‘System’ and then ‘Display. ‘ The GPU name is listed under ‘Graphics’ in the ‘Advanced Display’ section.
- The ‘Spec’ function can also be used to find out the graphics card details by pressing ‘Win + X,’ selecting ‘System,’ and then clicking ‘About. ‘ After clicking on ‘Windows specifications,’ the computer’s specs, including the GPU, are displayed.
Using DirectX Diagnostic Tool for GPU Information
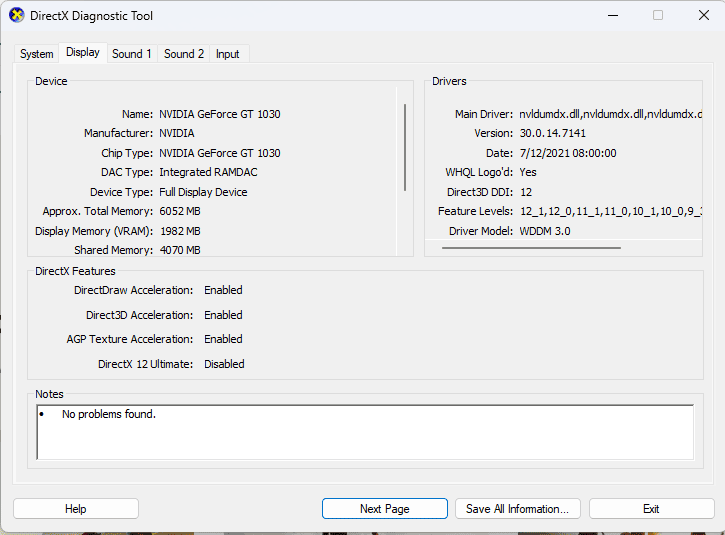
You can check your GPU on Windows by clicking the ‘Display’ tab in DxDiag, and looking for the name of your graphics card drivers in the system information provided. This in-built Windows feature provides valuable insights about your GPU, instrumental for comprehending the graphics prowess of your system. It’s crucial for those involved in graphics-heavy tasks like premium gaming or professional video editing.
To use DxDiag, press ‘Windows’ + ‘R’, type ‘DxDiag’, and click ‘OK’.
This step unveils your GPU’s specifications. Whether you’re on Windows 7, 10, or 11, this procedure stays the same, offering reassurance to users across various OS versions
Finding Your Graphics Card on a Windows PC
Both play uniqWith straightforward tools like the Device Manager in Windows 10 and 11, you can easily check your GPU’s specifications and determine whether you have an Nvidia or AMD graphics processing unit, which can significantly improve your gaming experience on your laptop.
Windows provides user-friendly tools to help you understand your GPU, regardless of whether you’re using Windows 7, 10, or 11. One of these tools is the Task Manager. This comprehensive dashboard details your computer’s performance.
To get started, press ‘Ctrl’ + ‘Shift’ + ‘Esc’ and navigate to the ‘Performance’ tab. In the GPU section, you’ll find important information about your Graphics Processing Unit. If you’re using a laptop, you might see two GPUs listed. Generally, one is an integrated GPU (usually an Intel chip), and the other is a dedicated GPU (likely Nvidia or AMD).
ue roles in graphics processing. It’s also crucial to regularly check your GPU to ensure optimal gaming performance on your Windows 10 laptop.
Key Points About GPU Management in Windows
- Windows 10 and 11 provide built-in tools like the Device Manager to check GPU specifications and identify the type of graphics processing unit (Nvidia or AMD).
- The Task Manager is a comprehensive tool that provides detailed information about your computer’s performance, including the GPU. It can be accessed by pressing ‘Ctrl’ + ‘Shift’ + ‘Esc’ and navigating to the ‘Performance’ tab.
- On a laptop, you might see two GPUs listed in the Task Manager. One is generally an integrated GPU (usually an Intel chip), and the other is a dedicated GPU (likely Nvidia or AMD). Each has a unique role in graphics processing.
- Regularly checking your GPU specifications and performance can help ensure optimal gaming experience on your Windows 10 laptop.
How to Check Your Graphics Card on Windows 11
For a convenient way to check your GPU, we would recommend you type ‘DirectX Diagnostic Tool’ into your Start Menu search bar and press enter to view your CPU specs and display information. This data will include details about your GPUs and display adapters. Once the tool opens, navigate to the ‘Display’ tab to find out more about your GPU.
Another option to check out your GPU is the Device Manager. You can easily access it via the Start Menu, or by typing ‘Device Manager’ into the search bar. Once open, you will need to click the drop-down arrow next to ‘Display adapters’ to see the name of your Graphics card.
Beyond this, you could resort to the System Information tool for a more advanced display of your hardware. Just type ‘System Information’ into the Start Menu and look for the name of your Graphics card under ‘Components > Display’.
For those who need to update their drivers, entering ‘Device Manager’ in the search bar and expanding the ‘Display adapters’ section will reveal the GPU you have installed.
Deciphering Laptop Graphics Card Details
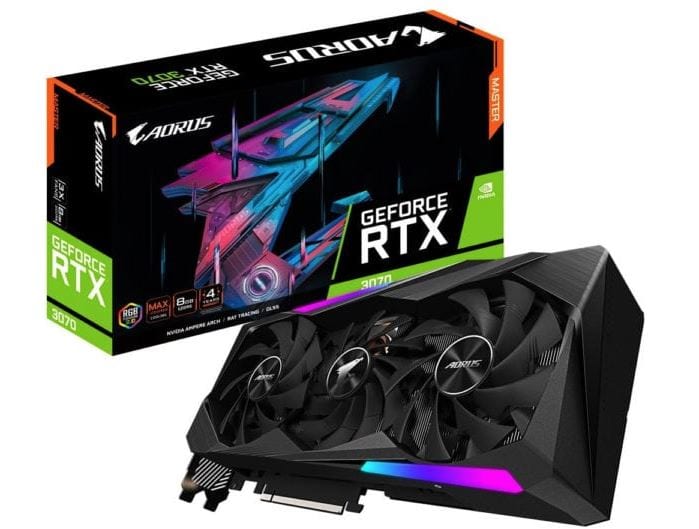
The graphics card market focuses on delivering powerful GPUs capable of elevating your gaming and video editing experiences. Understanding which GPU is in your device, such as an NVIDIA GeForce RTX or an AMD Radeon, can provide valuable insights into your laptop’s capabilities and shortcomings. Because of this, Windows PC users need to check their graphics card in the system information via the device manager or control panel.
To check your graphics card on a Windows PC, navigate to the Control Panel and select ‘System and Security’. Then, click on ‘System’.
From the options listed on the left, select ‘Device Manager’. Here, you’ll find ‘Display Adapters’ which, when clicked, will reveal the specific type of graphics card installed in your device.
The DirectX Diagnostic Tool provides a detailed rundown of your graphics card. Press the ‘Windows’ and ‘R’ keys simultaneously, type ‘dxdiag’, and press ‘Enter’. Upon launching this tool, navigate to the ‘Display’ tab for extensive information about your graphics, so you can find out what graphics card your Windows PC is currently utilizing.
Key Points About Checking Your Graphics Card
- The graphics card market is focused on delivering powerful GPUs that can enhance your gaming and video editing experiences.
- Windows PC users can check their graphics card in the system information via the device manager or control panel.
- Knowing the type of GPU in your device, such as an NVIDIA GeForce RTX or an AMD Radeon, can give you an understanding of your laptop’s capabilities.
- The DirectX Diagnostic Tool provides a detailed overview of your graphics card, helping you understand which graphics card your Windows PC is currently using.
Advanced Display and System Information for GPU Specs
Your laptop can become overheated while playing PC games if the graphics drivers are outdated, so it’s recommended to check on them and always keep them updated.
For users of Windows 10, Windows 11, or PCs, there are many ways to find out what graphics card is installed in your system, and if it is still in good condition. One such method is through the DirectX Diagnostic Tool.
To access this, simply click the Start button, type ‘run’ into the search box and press Enter. In the Run box, type ‘dxdiag’ and press Enter again. In the DirectX Diagnostic Tool, click the Display tab to see the name and other information about your graphics card.
Another method to check your GPU is through the Device Manager. You can access this tool by right-clicking on the Start menu and then selecting Device Manager from the list.
In the Device Manager window, click the drop-down arrow next to Display Adapters to reveal the graphics card(s) installed on your system. The Task Manager in Windows 10 and the Nvidia control panel can be used together to check the graphics card in a laptop, ensuring optimal performance for PC games.
What is a Graphics Driver?
If you’re using a discrete graphics card like the Nvidia Geforce, it’s essential to keep your graphics driver up to date, especially if you’re on Windows 11. This is to ensure optimal rendering and prevent system crashes.
This specialized software allows seamless communication between the graphics hardware and the central processing unit (CPU), in turn, enhancing the visual performance of your PC.
Whether the driver is from a well-known manufacturer such as NVIDIA GeForce or another brand, it serves as an interpreter, translating the language of the operating system into a format the hardware can understand.
Keeping an updated graphics driver ensures not just an optimized computer performance, but also reduces the chance of bugs cropping up.
This is particularly crucial if your system runs on Windows 10 or Windows 11, as the graphics driver leverages the VRAM – a memory dedicated to video rendering within the systems.
Key Points About Graphics Driver Maintenance
- A graphics driver, such as the Nvidia Geforce, aids in the communication between the graphics hardware and the CPU, thus improving the visual performance of your PC.
- Regardless of the brand, the graphics driver acts as an interpreter, converting the language of the operating system into a format the hardware can comprehend.
- Regularly updating your graphics driver not only optimizes computer performance but also minimizes the occurrence of bugs.
- This is particularly important for systems running on Windows 10 or Windows 11 as the graphics driver utilizes the VRAM, a memory specifically dedicated to video rendering within the systems.
Checking GPU Through Task Manager
You can find the graphics card or GPU in your Windows PC by checking the display tab under the system information. This is applicable for both Nvidia and AMD setups, and it provides crucial information about your graphics card, which can aid in tasks like video editing and other graphics-heavy tasks. So, whether you’re using Windows 10, or the latest Windows 11, the process remains the same.
From the Start menu, navigate to the Task Manager, then to the ‘Performance’ tab where you can view real-time graphics processing data. The information includes the GPU name, driver version, and any advanced display settings currently being used.
Another handy tool, the DirectX Diagnostic Tool, also provides comprehensive information about your graphics card. It details everything from spec to graphics drivers, and it’s as easy to use.
Simply press ‘Enter’ after typing ‘dxdiag’ in the Start menu search bar. The Device Manager, a classic control panel tool, also allows you to view your GPU. Simply click the drop-down arrow next to ‘Display adapters’ to see the name of your graphics card
Decoding Graphics Card Details for Gaming

Open the start menu and navigate to the display adapters on your device manager to find out what graphics card your system is equipped with; this is one of the effective ways to check your GPU and ensure a top-notch gaming experience with the right graphics card. The advanced display settings in the control panel also provide insights into the performance of your GPU.
Delving into the system information will further reveal the detailed specs of your graphics card. Your gaming and video editing experiences depend significantly on your GPU, be it NVIDIA or AMD.
Understanding your graphics processing unit (CPU) and the corresponding video memory is essential for optimizing these experiences. Tools like the Windows Task Manager offer a glimpse into GPU performance, presenting valuable data that can guide adjustments to enhance gaming performance.
Whether you’re on Windows 10, Windows 7, or have upgraded to Windows 11, checking your GPU and understanding its capabilities is essential for getting the most out of your system.
How to Check GPU | Importance of GPU
Through the start menu and display adapters in device manager | Significant for gaming and video editing experiences
Using advanced display settings in the control panel | Understanding GPU and video memory optimizes gaming and video editing
Windows Task Manager provides insights into GPU performance | Valuable data from GPU performance can enhance gaming performance
Importance of Graphics Processing Unit in Video Editing

The true power of PC gaming lies in the technology it employs, such as dedicated graphics cards and Nvidia GPUs optimized for Windows 10 Pro. A GPU specializes in parallel processing, a significant advantage over a Central Processing Unit (CPU) that primarily processes tasks serially.
This trait allows the GPU to handle multiple tasks at a time, greatly enhancing its power and efficiency in dealing with high-resolution video content and complex rendering tasks. Notably, a GPU’s prowess isn’t only about its hardware but also its software – specifically, the graphics drivers.
These drivers, as the link between the GPU and the system’s software, play a crucial role in the GPU’s performance. They convert the system’s commands into instructions that the GPU can comprehend and act upon.
Thus, keeping your graphics drivers updated is essential in ensuring your GPU operates at its best and takes full advantage of its capabilities.
Understanding Graphics Performance on Nvidia and AMD Systems
On your keyboard, you can type ‘dxdiag’ into your PC’s start menu to open the DirectX Diagnostic Tool; this tool reveals the system information window and helps you understand how powerful your GPU is by viewing the GPU name under the arrow next to display adapters.
To check your GPU using the DirectX Diagnostic Tool on your Windows PC, follow these steps:
Press the Windows key and R to open the run dialog box.
Here, type ‘dxdiag’ and hit ‘Enter’.
This action will open the DirectX Diagnostic Tool, where you should click on the ‘Display’ tab.
Here, you will find information about your graphics card, including the name, manufacturer, and the amount of ‘video memory’ available.
To use the Device Manager method on your Windows PC, do the following:
Press the Windows key and X, then choose ‘Device Manager’ from the list that appears. In the Device Manager window, click on the ‘Drop-down arrow’ next to Display Adapters to understand more about how powerful your GPU is.
Checking GPU on Windows PC
- The DirectX Diagnostic Tool is an inbuilt feature in Windows that provides detailed information about the hardware and drivers of the computer.
- The ‘dxdiag’ command is a quick and easy way to access this tool.
- The ‘Display’ tab in the DirectX Diagnostic Tool provides comprehensive details about the graphics card, including its name, manufacturer, and available video memory.
- The Device Manager in Windows also provides information about the GPU, and can be accessed by pressing the Windows key and X, then selecting ‘Device Manager’ from the list.
